


Having a functional car battery is essential for the proper functioning of your vehicle. It powers the electrical components and enables you to start your engine. However, a dead battery can leave you stranded, especially at inconvenient times. In such situations, jumper cables can be a lifesaver, allowing you to charge the dead battery using the power of another vehicle’s battery.
In this guide, we will walk you through the process of how to charge car battery with jumper cables. We will provide step-by-step instructions and highlight the essential safety precautions you should take. By following these instructions carefully, you can safely revive a dead battery and get your vehicle back on the road.
How to Charge a Car Battery with Jumper Cables
Keep in mind that safety is of utmost importance when handling jumper cables and car batteries. Be cautious, use proper protective equipment, and focus on every detail during the procedure. With that said, let’s explore the step-by-step method of how to charge car battery with jumper cables
Step 01: Understanding Jumper Cables
Components of jumper cables
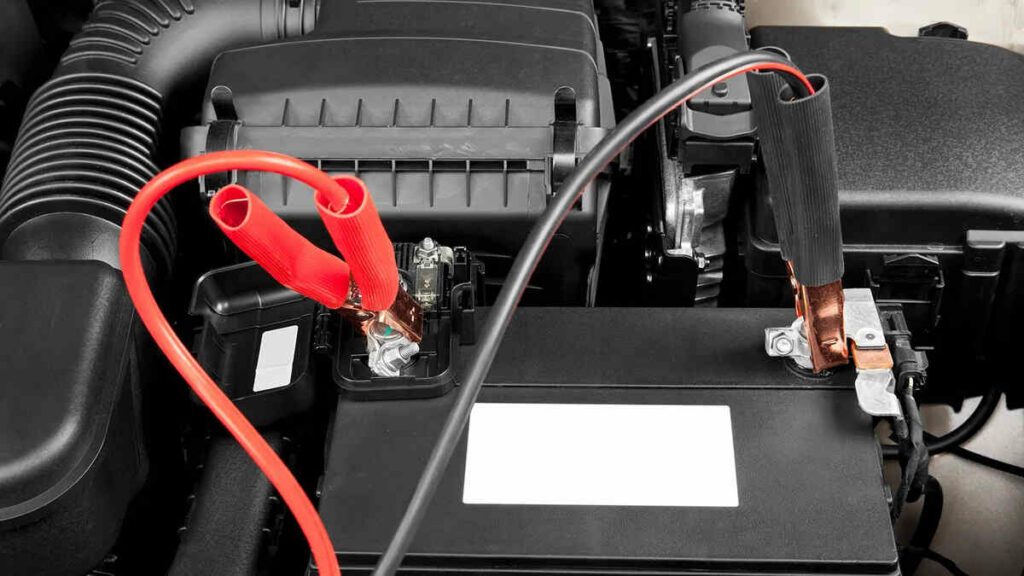
- Clamps: Jumper cables have clamps on each end that attach to the battery terminals. These clamps are usually color-coded, with red indicating the positive terminal (+) and black indicating the negative terminal (-). The clamps are designed to securely grip the battery terminals for a solid electrical connection.
- Cables: The cables themselves are made of heavy-duty wire that can handle the electrical current required for jump-starting a car battery. The cables are usually around 8-10 feet long to provide enough reach between vehicles.
- Insulation: The cables are insulated to protect against electrical shocks and prevent short circuits. The insulation is typically made of durable, heat-resistant materials such as PVC or rubber.
Different Types Of Jumper Cables
Jumper cables are available in various sizes and gauges. The gauge of the cable refers to its thickness, with lower gauge numbers indicating thicker cables. Thicker cables offer better conductivity and are more suitable for jump-starting larger vehicles or batteries.
When selecting jumper cables, consider the following:
- Gauge: Opt for cables with a lower gauge, such as 4 or 6 gauge, as they provide better conductivity. Thicker cables are generally more reliable
- Length: Choose cables that are long enough to reach between vehicles comfortably. Cables around 8-10 feet in length are usually sufficient for most situations.
- Quality: Invest in high-quality jumper cables that are well-insulated and durable. Look for cables with sturdy clamps and reliable connectors.
It’s worth noting that some jumper cables come with additional features like surge protection or built-in safety mechanisms. While these features can provide added convenience and safety, they are not necessary for basic jump-starting.
Step 02: Safety Precautions
When working with car batteries and jumper cables, safety should be your utmost priority. Here are some important safety precautions to follow:
Importance of safety when working with car batteries:
Understanding the potential hazards associated with car batteries is crucial for ensuring a safe and successful jump-start.
- Car batteries contain sulfuric acid, which is highly corrosive. Avoid contact with the acid and prevent it from splashing on your skin or eyes.
- Car batteries produce flammable hydrogen gas during charging. Avoid sparks, flames, and smoking near the battery.
Necessary safety equipment:
Before attempting to jump-start a car, ensure you have the proper safety equipment on hand.
- Wear gloves and goggles to protect your hands and eyes from acid and potential debris.
- Keep a fire extinguisher nearby, specifically rated for electrical fires, in case of emergencies
Identifying damaged cables or batteries and their risks:
It’s important to inspect both the jumper cables and the car battery for any signs of damage before proceeding.
- Inspect the jumper cables for any signs of damage, such as frayed wires, loose clamps, or cracked insulation. Damaged cables can cause electrical shocks or short circuits.
- Similarly, inspect the car battery for any cracks, leaks, or signs of corrosion. A damaged battery can release harmful chemicals or fail during the jump-starting process.
Precautions while handling jumper cables near the battery:
When connecting jumper cables to a car battery, take care to avoid potential hazards.
- Ensure the ignition and all electronics in both vehicles are turned off before connecting the jumper cables. This reduces the risk of electrical surges or damage to sensitive components.
- When handling the jumper cables, avoid touching the clamps together or allowing the clamps to touch any metal surfaces. This can cause sparks and potential electrical hazards.
Additional safety considerations:
Always follow the manufacturer’s instructions and guidelines for both the jumper cables and the vehicles involved in the jump-starting process.
- Avoid jump-starting a battery that is frozen, leaking, or damaged beyond repair. It’s better to seek professional assistance in such cases.
- If unsure or uncomfortable with the jump-starting process, contact a professional roadside assistance service for help.
Step 03: Preparing for Jump Starting
Before jump-starting the car battery, it is important to properly prepare and set up the vehicles. Follow these steps to ensure a safe and successful jump-start:
Identifying the location of the car battery and its terminals: Before attempting a jump-start, it’s essential to locate the car battery and identify its terminals.
- Lift the hoods of both vehicles to find the car batteries, which are typically located within the engine bay.
- Pay attention to the positive (+) and negative (-) terminals on each battery. The positive terminal is generally identified by a plus symbol or the letters “POS” or “P,” whereas the negative terminal is denoted by a minus symbol or the letters “NEG” or “N.”
Inspecting the condition of the dead battery: A thorough inspection of the dead battery is critical before attempting a jump-start.
- Examine the dead battery for any visible damage, leaks, or corrosion. If the battery is damaged or leaking, do not attempt to jump-start it.
- Seek professional assistance or replace the battery if necessary.
Positioning the vehicles for jump-starting safely: Proper vehicle positioning is key to a safe and successful jump-start.
- Ensure that both vehicles are parked in a way that allows the jumper cables to reach each battery comfortably.
- Keep the vehicles a safe distance apart, but avoid excessive tension or stretching of the cables.
- Make sure the vehicles are in the park (for automatic transmissions) or neutral (for manual transmissions) and that the parking brakes are engaged.
Turning off all electronics and the ignition in both vehicles: To minimize potential risks during the jump-starting process, ensure all electronics and the ignition are turned off in both vehicles.
- Turn off all electronic accessories, such as headlights, radios, and air conditioning, in both vehicles. This prevents a sudden surge of electrical current when making the connection.
- Turn off the ignition in both vehicles to minimize the risk of sparks or accidental starting during the jump-starting process.
Step 04: Connecting the Jumper Cables
Properly connecting the jumper cables is crucial for a successful jump start. Follow these step-by-step instructions to ensure the correct connection:
Properly identifying positive and negative terminals: Before connecting jumper cables, it’s crucial to accurately identify the positive and negative terminals on both the charged and dead batteries.
- Identify the positive (+) and negative (-) terminals on both the charged battery and the dead battery. They are usually marked with the appropriate symbols or labels.
- It is important to correctly identify the terminals to avoid reverse polarity, which can damage the electrical systems of the vehicles.
Connecting the positive terminal to the charged battery: Begin by connecting the positive terminals of both batteries.
- Grab one end of the red jumper cable and fasten the clamp to the positive terminal on the working battery, making sure the connection is tight and secure.
- The positive terminal is commonly marked with a plus symbol or the letters “POS” or “P.”
Connecting the negative terminal to the dead battery: Next, connect the positive terminal of the dead battery.
- Take the other end of the red jumper cable and attach the clamp to the positive terminal of the dead battery. Make sure the connection is secure.
- It is important to connect the positive terminals first to avoid any accidental grounding of the circuit.
Connecting the negative terminal to the charged battery: Now, move on to the negative terminals.
- Attach one end of the black jumper cable to the negative terminal of the functional battery by securing the clamp, guaranteeing a reliable connection.
- The negative terminal is typically marked with a minus symbol or the letters “NEG” or “N.”
Connecting the negative terminal to a grounded metal part: Finally, complete the connection by attaching the remaining end of the black jumper cable to a grounded metal part.
- Locate an unpainted metal surface or a metal component of the vehicle with the dead battery, away from the battery itself.
- Attach the other end of the black jumper cable to this grounded metal part. This helps prevent sparks near the battery.
Step 05: Jump-Starting the Car
Once the jumper cables are properly connected, you can proceed with jump-starting the car. Follow these instructions to start the car with the working battery, revive the dead battery, and complete the jump-starting process:
- Instructions for starting the car with the working battery: After ensuring the jumper cables are firmly attached, start the engine of the car with the functional battery. Allow it to run for a short period, enabling the battery to accumulate a charge.
- Starting the car with the dead battery and reviving it: With the working vehicle’s engine running, attempt to start the car with the dead battery. If the engine doesn’t start, turn off the ignition and wait for a minute or two. After waiting, try starting the car with the dead battery again. If it still doesn’t start, proceed to the next step.
- Letting the charged battery and dead battery stabilize: To give the dead battery some time to charge from the working battery, keep both vehicles connected by the jumper cables for a few more minutes, with the working vehicle’s engine still running.
- Testing the success of the jump-start and removing the cables: After allowing enough time for charging, attempt to start the car with the previously dead battery again. If the engine starts successfully, let both vehicles idle for a couple of minutes to stabilize the battery charge.
- Carefully remove the jumper cables in the reverse order of connection: When it’s time to disconnect the jumper cables, follow the steps in reverse order. Start by removing the black cable from the grounded metal part of the previously dead vehicle. Next, remove the black cable from the negative terminal of the charged battery. Next, detach the red cable from the positive terminal of the formerly depleted battery. Lastly, disconnect the red cable from the positive terminal of the working battery. Once the cables are disconnected, it is important to secure them properly and avoid contact between the clamps and any metal surfaces.
Step 06: Post-Jump Starting Tips
After jump-starting your car, there are some important considerations and recommendations to keep in mind. Follow these tips to ensure the proper functioning of your vehicle and battery:
Recommendations for driving the vehicle after a jump start:
- Drive your vehicle for at least 20 minutes to allow the alternator to recharge the battery fully.
- Avoid using excessive electrical accessories during this time to prioritize the charging process.
- Maintain a moderate driving style and avoid sudden acceleration or braking, as this can put additional strain on the battery.
Charging the revived battery fully using a battery charger:
- Even though the jump start may provide enough charge to start the car, it is recommended to fully recharge the revived battery using a battery charger.
- Connect the battery charger to the battery according to the charger’s instructions and let it charge the battery until it reaches a full charge.
- This helps ensure the battery’s optimal performance and longevity.
Common issues that may arise after a jump start:
- While jump-starting can resolve a temporary battery issue, it may not address underlying problems with the battery or the vehicle’s electrical system.
- Keep an eye out for recurring battery problems, such as difficulty starting the car, dimming lights, or a recurring need for jump-starting.
- If you experience any of these issues, it is advisable to have your vehicle inspected by a qualified mechanic to identify and address the root cause.
When to consider replacing the car battery:
- If your car battery frequently fails to hold a charge even after jump-starting and recharging, it may be a sign that the battery is reaching the end of its lifespan.
- Other signs of a failing battery include corrosion, bulging or cracked case, or a foul smell coming from the battery.
- If you notice any of these signs, it is recommended to have your battery tested by a professional and consider replacing it if necessary.
Frequently Asked Questions: Charging a Car Battery with Jumper Cables
As we explore the process of charging a car battery with jumper cables, let’s tackle some frequently asked questions that often surface in this context.
How long can a jump start last?
A jump start is intended to provide enough charge to start the vehicle with the dead battery. As soon as the engine starts, the alternator assumes responsibility for charging the battery. The jump-start process usually lasts from a few seconds to several minutes. Nonetheless, it’s crucial to keep the vehicle running for a minimum of 20 minutes afterward, giving the alternator ample time to fully replenish the battery.
Can I jump-start a car in the rain?
It is generally safe to jump-start a car in the rain. However, it is essential to exercise caution and ensure that the jumper cables and connections do not come into contact with water. Water can conduct electricity and increase the risk of electrical shock. Therefore, take extra care to keep the jumper cables and clamps dry during the jump-starting process.
What happens if I connect the jumper cables incorrectly?
Connecting the jumper cables incorrectly can result in electrical damage to the vehicles involved. If you accidentally connect the cables in reverse polarity (positive to negative and vice versa), it can cause a short circuit and damage sensitive electronic components. This can lead to costly repairs. Always double-check the proper connection of the cables before initiating the jump-starting process.
Can I use a smaller vehicle to jump-start a larger one?
Yes, it is possible to use a smaller vehicle to jump-start a larger one, as long as both vehicles have compatible battery systems (12-volt, for example). However, keep in mind that a larger vehicle with a higher-capacity battery can provide a stronger current to aid in the jump-starting process. It is recommended to follow the instructions outlined in the vehicle’s manual regarding jump-starting and use caution when connecting the cables.
Is it necessary to rev the engine while jump-starting?
In most cases, it is not necessary to rev the engine while jump-starting. Once the jumper cables are connected and the working vehicle’s engine is running, allow it to idle for a few minutes to transfer the charge to the dead battery. Revving the engine excessively during the jump-starting process can potentially damage the electrical systems of both vehicles. It is best to let the vehicles stabilize and the battery charge builds up gradually.
How often should I check my car battery?
It is advisable to have your car battery checked regularly, especially before long trips or during routine maintenance. A good practice is to have the battery inspected at least once a year or as recommended by the experts, pay attention to signs of a weak or failing battery, such as slow cranking, dimming lights, or a recurring need for jump-starts. If you notice any of these signs, it is recommended to have your battery tested by a professional.
Choose HEART Auto Care for Your Car's Battery Needs
Looking for reliable car battery services? Choose HEART Auto Care! With our expertise, quality service, and comprehensive battery services, we ensure your vehicle’s battery performs at its best. Trust us to deliver exceptional care and keep you on the road. Schedule an appointment today and experience the difference of working with a trusted automotive service provider. Contact us now for top-notch car battery care at HEART Auto Care.
Be sure to also check out our informative blog post on extending your car battery’s lifespan.
Conclusion
A working car battery is crucial for your vehicle’s seamless performance. In this guide, we’ve offered a detailed explanation of charging a car battery using jumper cables. Nonetheless, always prioritize safety when dealing with car batteries.
Jumper cables are a handy tool for jump-starting a dead battery, allowing you to get back on the road quickly. By following the step-by-step process outlined in this guide, you can learnhow to charge car battery with jumper cables safely and effectively.
Throughout the process, it is crucial to prioritize safety.
- Wear protective gloves and goggles, and keep a fire extinguisher nearby in case of any mishaps.
- Inspect the cables and batteries for any damage, and handle the jumper cables with caution when connecting them to the battery terminals.
Once you have successfully jump-started your car, let the charged battery and dead battery stabilize for a few minutes. Test the success of the jump start by starting the vehicle with the dead battery. If it starts without issues, you can remove the jumper cables carefully.
After a jump start, it is recommended to drive the vehicle for a reasonable distance to allow the alternator to recharge the battery fully. If the battery repeatedly fails to hold a charge or shows signs of aging, it may be time to consider replacing it.
Remember, if you are uncertain or uncomfortable with jump-starting your car battery, it is always best to seek professional assistance. At HEART Auto Care, we offer reliable and professional car battery services. Drive with confidence knowing that your vehicle’s battery is in top shape.